Title here
Summary here
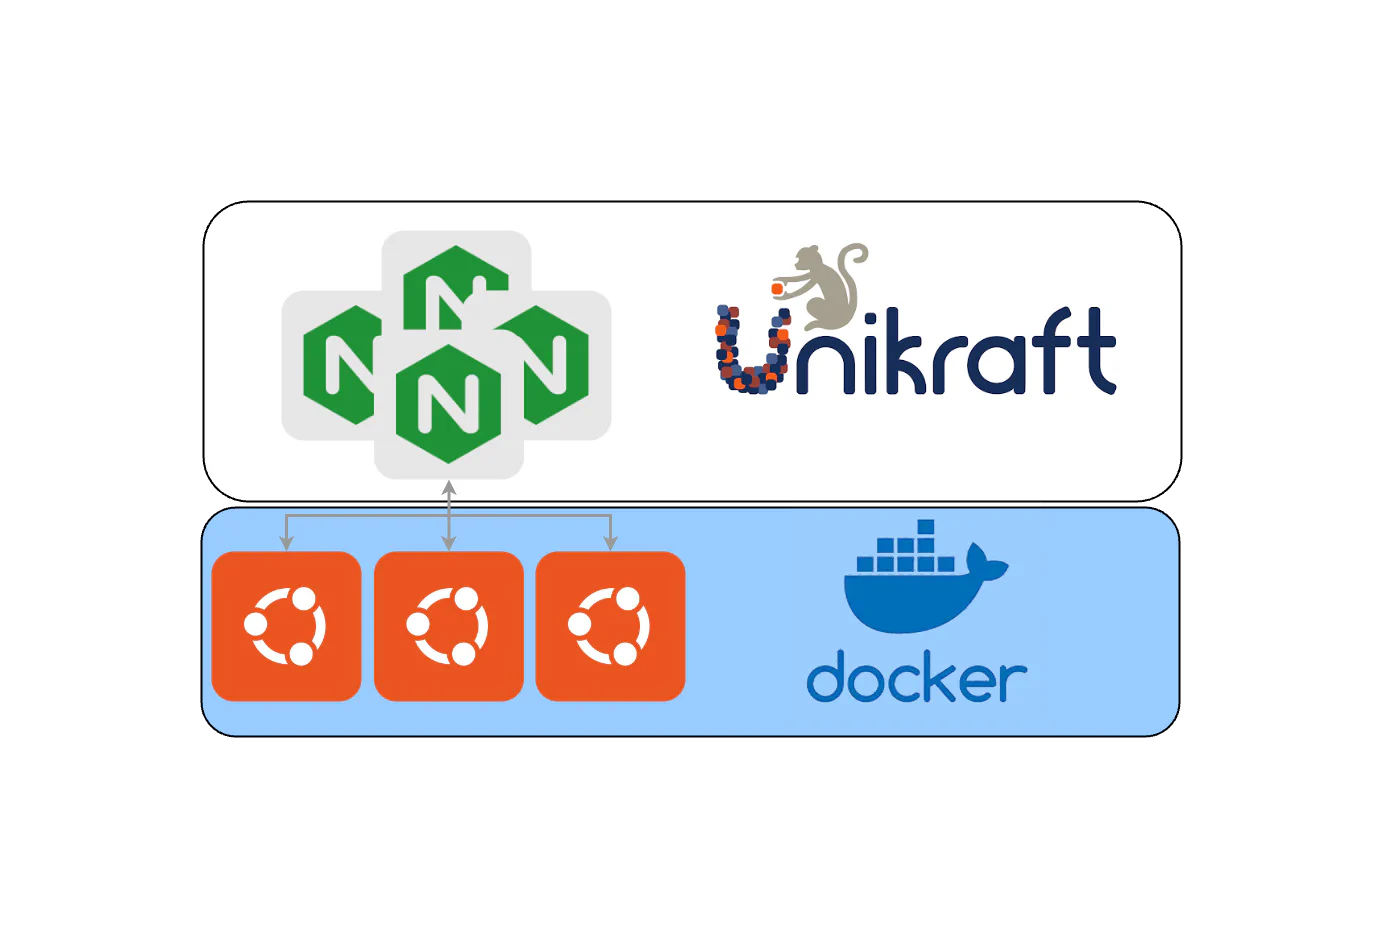
Unikernels within Oakestra
This guide is (almost) a clone of the containers Nginx client-server applications described in previous walkthrough, however, we instead use Unikraft Nginx server.
We can deploy Nginx using Unikraft. This will allow us to have a more lightweight and isolated version of Nginx for the machines supporting unikernel virtualization.
To enable unikernel support, please refer to the Unikernel Support manual section.
We create a service named curl using a curlimages/curl:7.82.0 docker image. This service performs a curl request to an Oakestra semantic IP address of our choice (10.30.30.31), and then it fails. After failure, Oakestra will re-deploy the instance indefinitely.
Together with the curlv4 service, we deploy a Nginx service named nginx using the nginx_amd64.tar.gz Unikraft image hosted online. This service will be assigned a Round-Robin semantic IPv4 address 10.30.30.31. Since this kernel image is only available for amd64 architecture, we specify this in the SLA template using "arch": ["amd64"], selector.
Oakestra Networking
To find out more about networking, please refer to the Networking section.
Refer to the following SLA template to deploy the services.
{
  "sla_version": "v2.0",
  "customerID": "Admin",
  "applications": [
    {
      "applicationID": "",
      "application_name": "clientsrvr",
      "application_namespace": "test",
      "application_desc": "Simple demo with curl client and Nginx server",
      "microservices": [
        {
          "microserviceID": "",
          "microservice_name": "nginx",
          "microservice_namespace": "nginx",
          "virtualization": "unikernel",
          "cmd": [
            ""
          ],
          "memory": 400,
          "vcpus": 1,
          "vgpus": 0,
          "vtpus": 0,
          "bandwidth_in": 0,
          "bandwidth_out": 0,
          "port": "9000:80",
          "storage": 0,
          "code": "https://github.com/oakestra/oakestra/releases/download/alpha-v0.4.301/nginx_amd64.tar.gz",
          "arch": [
            "amd64"
          ],
          "state": "",
          "addresses": {
            "rr_ip": "10.30.30.31"
          },
          "added_files": []
        },
        {
          "microserviceID": "",
          "microservice_name": "curl",
          "microservice_namespace": "nginx",
          "virtualization": "container",
          "cmd": [
            "sh",
            "-c",
            "curl 10.30.30.31 ; sleep 15"
          ],
          "memory": 100,
          "vcpus": 1,
          "vgpus": 0,
          "vtpus": 0,
          "bandwidth_in": 0,
          "bandwidth_out": 0,
          "storage": 0,
          "code": "docker.io/curlimages/curl:7.82.0",
          "state": "",
          "port": "",
          "added_files": []
        }
      ]
    }
  ]
}
Oakestra CLI Tool
In this guide we’ll use the comprehensive Oakestra CLI toolkit to interact with the Oakestra-managed infrastructure.
Check out how to deploy your first application with the CLI.
oak v oak a c --sla-file-name unikernel-nginx-client-server.json -dDid you know?
If your SLA file is not in the ~/oak_cli/SLAs directory you can use the following command instead:
oak a c --sla-file-name $(pwd)/unikernel-nginx-client-server.json -dNow the curl service will perform a curl request to nginx, then it will fail. Oakestra will re-deploy a new instance, and so the cycle will continue.
Let’s fetch the Nginx’s Service ID using
oak s sThen let’s deploy a second Nginx instance using:
oak s d <Nginx Service's ID>By running oak s s you should now see two instances of the Nginx service running.
╭──────────────┬──────────────────────────┬────────────────┬────────────┬──────────────────────────╮
│ Service Name │ Service ID               │ Instances      │ App Name   │ App ID                   │
├──────────────┼──────────────────────────┼────────────────┼────────────┼──────────────────────────┤
│ curl         │ 672cf97ff7728660d15a584d │  0 RUNNING ●   │ clientsrvr │ 672cf97fa3ba9aac11ea11af │
├──────────────┼──────────────────────────┼────────────────┼────────────┼──────────────────────────┤
│              │                          │  0 RUNNING ●   │            │                          │
│ nginx        │ 672cf97ff7728660d15a5852 │                │ clientsrvr │ 672cf97fa3ba9aac11ea11af │
│              │                          │  1 RUNNING ●   │            │                          │
╰──────────────┴──────────────────────────┴────────────────┴────────────┴──────────────────────────╯Use the following command to check the instance’s logs:
oak s i <Nginx Service ID>You’ll see the nginx logs of both instances, and the effects of the resulting balancing.
For this example we used the command oak s i 672cf97ff7728660d15a5852
╭───────────────────────────────────────────────────────────────────────────────────────────────╮
│ name: nginx | NODE_SCHEDULED   | app name: clientsrvr | app ID: 672cf97fa3ba9aac11ea11af      │
├───────────────────────────────────────────────────────────────────────────────────────────────┤
│ 0 | RUNNING ● | public IP: 131.159.24.51 | cluster ID: 672cf976f7728660d15a583e | Logs :      │
├───────────────────────────────────────────────────────────────────────────────────────────────┤
│ 10.30.0.2 - - [07/Nov/2024:17:41:04 +0000] "GET / HTTP/1.1" 200 615 "-" "curl/7.82.0-DEV" "-" │
│ 10.30.0.2 - - [07/Nov/2024:17:41:34 +0000] "GET / HTTP/1.1" 200 615 "-" "curl/7.82.0-DEV" "-" │
├───────────────────────────────────────────────────────────────────────────────────────────────┤
│ 1 | RUNNING ● | public IP: 131.159.24.51 | cluster ID: 672cf976f7728660d15a583e | Logs :      │
├───────────────────────────────────────────────────────────────────────────────────────────────┤
│ 10.30.0.2 - - [07/Nov/2024:17:37:34 +0000] "GET / HTTP/1.1" 200 615 "-" "curl/7.82.0-DEV" "-" │
│ 10.30.0.2 - - [07/Nov/2024:17:41:19 +0000] "GET / HTTP/1.1" 200 615 "-" "curl/7.82.0-DEV" "-" │
╰───────────────────────────────────────────────────────────────────────────────────────────────╯
As you can see both instances got requests from the single client we have, even is the client is always using the same IP address.